Showing posts with label grow food at home. Show all posts

Tuesday, April 21, 2015

South Florida Gardening Winners and Losers

So if you follow this blog, you must think I died or quit gardening.  Quite the contrary.  While the rest of the country has been dreaming of gardening, I've been doing it.

The South Florida growing season is drawing to a close and the rest of you are just getting started,  Here is what worked for me this year and what was a flop!

The Biggest Loser!

cucumber growing with aquaponicsBy far, the worst performers in my garden this season were the cucurbits!  I am not holding a pity party for them however.  They had much going against them, but they didn't give it much of a try.  I know I was not alone.  During a visit to a local nursery in January I overheard the staff in charge of the vegetable section tell a customer they had no luck with cucurbits either.  Our November was cooler than normal, followed by a December that was not only cool, but it was damp as well.  A quick review of cucurbit growing conditions does not include the terms "damp" or "cool".  I managed to get just a few Straight Eight cukes out of a raft using the Deep Water Culture (DWC) technique.  Growing a vining plant using DWC is always a challenge.  We ran string to get it to the garden frame and then just let it grow from there.  The plants in the flood and drain grow beds never produced at all. I ripped them out in January.  Despite many different attempts, I was not able to get new seeds to sprout.  Zero squash, zero melons, few cucumbers.  Cucurbits were a bust!

The Loser Runner Up!

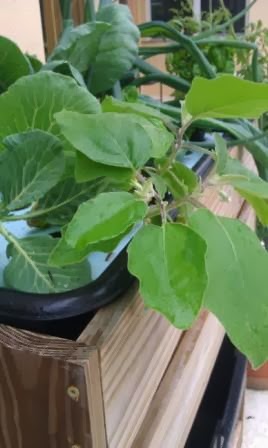
Is there a runner up loser place at the podium?  I don't know if it is official place, but cucurbits were almost beat out by the nightshades as poor performers.  The cool and damp conditions were not embraced by the eggplants.  They were tolerated by the peppers and the tomatoes thrived so the nightshades mixed performance kept them out of the bottom position.  eggplant in aquaponics The irregular weather conditions resulted in problems with chlorosis.  I had to chelate more this season than I have in any season past.  This picture is a perfect representation of the eggplant problem this season.  I harvested less than a dozen fruits.  Usually I can keep eggplant going into May.  This year it was done by February. This is the second year I have grown eggplants relying solely on aquaponic methods. Last year was such a success!  This year not so much.  Next growing season, I commit to growing with and without soil. 

The Good Stuff

Now for the winners!  I tried celery in a flood and drain bed for the first time.  OK, true confession time, it is the first time I have tried to grow celery ever.  Maybe celery is easy to grow, maybe the cooler than normal temperatures were a factor.  I just know that it grew exceptionally well. It has been tasty too!
celery in aquaponics
So next year I will try celery again and see if it is a fluke.  As an aside, I discovered that celery leaves are pretty tasty when they are young but bitter when they are older.  It is awesome to harvest your celery and then not spend all that time in the kitchen scrubbing the dirt off.  That is an unsung benefit of growing with aquaponics, faster produce cleaning in the kitchen!


swiss chard in aquaponics
Another big winner were the greens.  I grew kale and swiss chard with lots of success.  The chards took a littler longer to get going this year, but once they got going, there was no holding them back. The chards and kale were grown in both NFT tubes and flood and drain beds.  I didn't try any of these in soil this season.


Last year, the greens in the NFT tubes were the big winners, this year the plants in the flood and drain beds out performed their tube counterparts.  It just goes to show that when it comes to gardening, there are always surprises. 

This was my first season with Dinosaur kale.  It grows very quickly no matter the weather or light conditions.  Three plants were all that were necessary to provide more than enough for our table of 2.

The Winners!

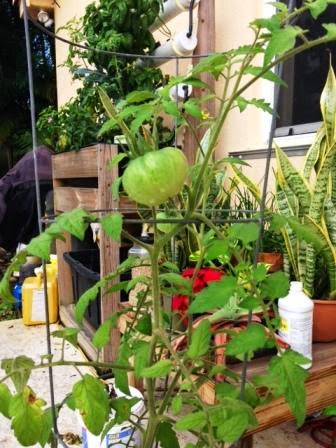
The winners were the mints, including basil and the peppers and the tomatoes.  I had tomatoes in soil and tomatoes in my aquaponic gardens.  I tried something old, Mr. Stripey, something new, Arkansas Traveler, and something borrowed and blue, Indigo Rose!
basil in aquaponics
The basil went wild in the NFT tubes.  I had to end up moving a Dinosaur kale to make more room. 

indigo rose tomato and cayenne pepper in aquaponics
 This is an Indigo Rose growing in an NFT Tube with a little cayenne pepper poking out behind it.  The Indigo Rose seeds were from my son's garden in Ohio.  When I visited in August, I opened one of his ripe tomatoes onto a paper towel and spread out the seeds and flesh to dry.  I brought the dried paper towel home and planted it, towel and all in October.  The Indigo Rose was by far the most prolific producer.  I had them in DWC rafts, flood and drain beds and soil.  They performed well in all situations.  The only down side to this tomato is that it takes for-fricking-ever to ripen.  The portion of the tomato that is kissed by the sun turns a bluish purple, the remainder will turn red or yellow when the tomato is ripe. 
Arkansas traveler tomato in aquaponics
 This was my Arkansas Traveler when it was setting its first fruit.  I only had one plant this year, but will certainly save seeds (using the paper towel method) because this is a great tasting tomato. It doesn't grow extremely large in either plant size or fruit size.  When ripe, it is a pink color.  It is very tasty and low acid.
mr stripey tomato
This is a "Mr. Stripey" that was growing in soil in a pot.  A real down side to buying starter plants is that anyone with a sense of mischief can cause problem in the garden center.  I bought this plant as a start and it was clearly marked "Mr. Stripey", which happens to be one of my favorite tomato varieties.  As it began to set fruit, O started doubting the veracity of the tag.  The tomatoes weren't as large as they should be and didn't exhibit stark striping.  When the first fruits started to ripen I knew I had been had.  The fruits turned red and not the beautiful orange-ish shade sported by Mr. Stripey.  I don't know who this imposter is, but it produces a medium sized red tomato with very light striping.  Unlike Mr. Stripey, it is very low acid. I am not saving the seeds.  I considered prosecuting it for impersonating a beloved heirloom, but decided the real culprit was the person at the garden center, not the plant.

Inedibles in Closing

  Believe it or not, the winter months aren't all about vegetables here at the end of the peninsula.  The shorter days mean that lots of plants start to bloom.  While you are looking at snow, I'm looking at kolanchoes.
 I'm enjoying the orchid blossoms.
And the Bolivian gloxinias start to bloom before Christmas and take us all the way through to Easter.
 
My season was a mixture of hits and misses.  Let me know what you are doing to make your season a success.  I'd love to hear from you!

Thursday, July 3, 2014

Okra in Aquaponics

It has been awhile since I've posted.  As I've written before, there is not much gardening that goes on in South Florida once the rainy season starts.  Our temperatures are in the 90's almost everyday.  In the month of June we had over 15" of rain and that was before our first brush with tropical weather.  To say that it is hot and humid would be like saying the Atlantic Ocean has a little water in it.

It is very hard to grow anything edible in those conditions (well except that the mangoes and avocados are getting ripe).  The irony of all ironies is that I can grow a few things using aquaponic techniques during this time.  Yes, plants that would drown from all the rain if they were planted in soil will do OK if they are planted in water.  They just must be plants that can take the heat.

Right now in my at home aquaponic gardens, I have purple hull peas, mint, lemon balm, rosemary, vinca, french marigold, oregano, miniature pepper,  green onion, and lots of okra growing.  The okra are the plants from the Floaters versus Sinkers seed wars I chronicled.  As I suspected, there is really no difference between the floater and sinker seeds once the seedlings were planted.

However I am seeing a difference in how the okra is growing using different techniques.  Unfortunately I don't have photos of  the plants that were growing the best.  These were the plants that were in NFT tubes.  Even though the okra variety is Cajun Jewel, a dwarf variety, they still get several feet tall.  Once I could no longer reach the plants in the tubes, I had to take them out and transplant them.  This involved pruning both roots and tops.  I re-established them in my newest  media grow bed with my purple hull peas and due to the pruning they are now the smallest of the plants.  Bonsai okra so to speak.

okra in aquaponicsThe okra in the DWC (deep water culture) rafts are growing steadily.  However they have not flowered and produced fruit yet.  As you can see, the plants are exceptionally healthy and should be flowering any day now.  By the way, the crud on the raft is caterpillar poo.  Hubby thought it would be nifty to put some zinnias on the raft, but instead grabbed some of my milkweed seedlings.  Needless to say it only took a few days to have monarch eggs and within 10 days they had hatched, eaten every bit of milkweed on the raft, and then conscripted into the caterpillar relocation program (CRP).

The okra that were planted in media beds filled with hydroton and gravel are also doing well.  They have just started to flower.  What is odd about this set outperforming the set in the raft is these plants receive an eastern exposure.  The plants in the raft get a southern exposure.  Southern exposure equals more sun, however the eastern exposure plants are outperforming their southern kin.  I know that there are people sold on DWC for all plants, but it has been my experience that in most instances plants in media beds do better.  Maybe I am doing something wrong, but I get more nitrates using a media bed than depending on the biofilm on the raft.

The current superstar okra (since their kin in the NFT tubes got the bonsai treatment) are the okra that are in a bed of lava rock and a small layer of gravel.  I really don't like planting in lava rock because even with gloves on your hands it is hard work and always seems to ruin my manicure.  But those lava rocks provide an incredible amount of specific surface area for the nitrifying bacteria to take hold.  The honeycomb
structure is similar to zeolite.  These okra plants have already begin to bloom, fruit, and produce their first harvest.  The okra have already crowded out the bottom row of NFT tubes that are mounted over the bed. I am planning on using that tube again when the okra get just a bit taller.  As I did last year, I will use the okra as a shade for other plants on that bottom tube.  This system is getting southern exposure like the DWC system, but it is doing so much better.

I was joking with a fellow gardener on-line this morning that I know so much useless information about okra.  It is in the same family as the hibiscus and cotton.  If you have ever seen an okra bloom, you know that they are very beautiful flowers.  And if you time time to actually look at an okra bud and bloom then you can easily see how hibiscus and okra are related.  The buds and flowers are shaped in a very similar manner.
okra in aquaponics bloom
I know lots of people don't like okra, but I think you just have to give it a chance.  It is only slimy if you boil it.  People eat oysters and they are slimy!  If you have an overabundance of okra, pick it while it is small and make pickles.  I like them pickled hot, bread and butter, or dill style.  I don't think I have ever made the acquaintance of an okra pickle that I didn't like.  I can't say the same for cucumber pickles.  Besides what would gumbo be without okra?  Okra is the defining ingredient in gumbo.  If it isn't thickened with okra, then it is just another soup. And okra makes an excellent fried vegetable. 

 By the way, I planted some of my okra seedlings in soil on the same day as I placed the others in the aquaponic gardens.  I've even given them a little fish emulsion to try to make things even.  The growth of the plants in soil can't be compared to even the slowest growth of the plants in the DWC system.  The soil based plants are not as richly colored and have not produced a bud or bloom yet. Their leaves are smaller and the plant stems thinner.  But they do attract visitors.  I wonder if this monarch is related to any of the 'pilars that started out on the DWC raft?  

If you have never tried to grow okra, I encourage to give it a shot. It is very forgiving and once it gets going is a prolific producer.  Even if you grow in soil, I still recommend growing the dwarf varieties because okra can get tall.  And last but not least, be sure to save some of your seed.  All of these plants are from last year's seed.

OK, I've shown you my okra......let's see yours!

Friday, March 14, 2014

Krazy for Kohlrabi!

Kohlrabi is a forgotten gem.  With the resurgence in interest in heirloom and other older vegetables kohlrabi may be poised for a comeback.  Look at how kale is the current trendy food when not too long ago it was eaten only because it was cheap and easy to grow.

Kohlrabi is the royal cabbage.  While it looks like a root vegetable, it is actually the stem of the plant you eat.  The name comes from the German for Cabbage Turnip.  When you look at kohlrabi (especially the purple varieties) you can see how it looks a bit like a turnip.  However, it is a member of the Brassica family.  Just like cabbage, broccoli, cauliflower, and brussel sprouts it has been selected by man for the characteristic of the bulging stem.


Looks Like a Turnip Tastes Like Broccoli


I am currently growing them using a flood and drain grow bed, deep water culture rafts, and nutrient film technique tubes.  Much to my surprise they are growing best with NFT.  I really thought they would excel in the grow beds and that they would be too top heavy for rafts or tubes. 

They do lean in DWC rafts and for some reason their bulb becomes elongated.  Doesn't change the taste but if you are growing for looks, well it looks odd. 
Leaning Tower of Kolhrabi


If you are growing for looks, you probably aren't growing kohlrabi to begin with because well
                     it is an odd looking veggie.
                                                                 Isn't it?


Kohlrabi can be eaten raw or cooked.  The taste is like the stem of the broccoli with a little bite of radish thrown in for a kick.  The smaller the "bulb" the more tender it is.  No matter the size, you certainly want to peel it before you eat it cooked or raw.  It has a very tough outer skin.

It is used in Asian and German cooking.  I prefer it cooked, but that is probably because that is how my Mom cooked it. 

If you look on the internet, you will find recipes for cooking the bulb and leaves.  I've never eaten the leaves....I was taught incorrectly that the stems and leaves were toxic to humans.  As an adult, I realize my Dad probably just said that because he didn't like the leaves. 

If you want to try it for yourself, it is very easy to grow in soil or in an aquaponic garden.  It likes cooler temperatures so you can direct sow seeds outdoors 4 to 6 weeks before your last frost.  So get them in the ground soon! They like a pH in the 6's and they need water to develop that fleshy stem.  If you grow in soil, beware that they have shallow roots.  Keep them well mulched if using soil. I haven't had a problem with cabbage worms but I did have to spray for aphids with my pepper/garlic spray (read about that here) on one set of tubes.  If using aquaponics, give them a try in NFT tubes.  I've been getting great results in both small and large tubes.

Are you krazy as I am for kohlrabi?

Wednesday, March 5, 2014

Small Tomatoes with Large Taste and Free Seed Offer

I just love small tomatoes!  They are perfect for sneaking a taste when working out in the gardens.  You can be hot and sweaty but that burst of juice in your mouth and the combination of sweet and acid on your tongue can be mighty refreshing.  Even when it comes in a very small package.

I read one time that there are about 10,000 varieties of tomatoes.  They fall into two categories:  determinate and indeterminate.  The determinate plants are a bush variety and grow until they set fruit (yes a tomato is a botanical fruit) on the terminal bud.  Then all fruit ripens over a 1 to 2 week period.

I like to grow indeterminate tomatoes.  For most of the country, this means that they will grow until killed by frost.  Since I live where we never have frost, we plant in the fall and our tomatoes grow until they are killed by the heat and moisture from our rainy season (sometime in May).

Most varieties of the smaller tomatoes are of the indeterminate variety.  This means you can enjoy their goodness all season long. 

Right now I am crazy for Yellow Pear and Everglades tomatoes.  Let's face it, who wouldn't be crazy about a tomato that has a waist? 
Just look at these little gems from the garden. Scarlett O'Hara herself would be green with envy of that small yellow waist!  And no corset was needed.  No pear has ever been as adorable as my yellow pear tomatoes.  They originated in Europe in the 1700's and fell out of fashion for a bit but have come back in a big way for such a small tomato.  While considered a "sweet" tomato, I think they are on the acidic side and taste tart.  They are yummy when tossed in salads, as a topping for frittatas, or simply enjoyed with a few leaves of basil, a pinch of salt, and a dash of oil and balsamic vinegar.

The other tomato that I am crazy for this year is the native Everglades tomato.  This is the only tomato that is native to South Florida.  Not only is it indeterminate but it can stand up to the heat and torrential downpours of our rainy season.  I have Everglades tomato plants in an aquaponics flood and drain bed that are almost a year old!  They grow on sprawling vines and produce in clusters of 8 or 9 like a cherry tomato.  I don't think you can kill an Everglades tomato.

If you look at this photo, I set one Everglades tomato on a quarter so you would have perspective on the size of this mighty tasting tomato.  It might be a small tomato but it has more sweet taste than any large beefsteak

These are addictive when eaten in the garden. It really is hard for me to get them to the house.  But if they make it, they are perfect in a salad.  Or eaten out of hand.  Good thing I have them everywhere...which leads me to the free offer.

I want to see the Everglades tomato get the attention it deserves.  If you will email me at allergycheryl@gmail.com and in the email subject put "Free Seeds" I will email you back with my address.  You can send a self addressed stamped envelope and I will send you some free Florida Everglades tomato seeds.  Then you can enjoy this awesome small tomato with a very very large taste

Wednesday, January 8, 2014

A Tale of Two Eggplants

I love nightshades.  They are one of the most diverse families of plants and contain some of my most favorite things to eat.  The Solanaceaes include tomatoes, peppers, eggplants and potatoes.  It also includes petunias and tobacco..  You can keep the potatoes, petunias and  tobacco.  I don't smoke, I don't like to eat potatoes ( I prefer rice) and petunias stink. But tomatoes, peppers and eggplants....Oh My!  And cooking all three together?  Even more Oh My!

I am currently growing several types of tomatoes, peppers, and one type of eggplant.  I have had poor luck with germinating pepper and eggplant seeds this season for some reason.  I put my eggplants in two different test systems this time to see if there was a difference in plant growth or production.  Early results say that my eggplants are preferring a flood and drain environment to a deep water culture (DWC) system.

Here is the picture of the eggplant in my flood and drain test bed. 
The largest leaf on this plant measures 9" wide and is 11" long. As a matter of fact I had to tie it up today as the leaves are so heavy the plant had flopped over and was shading the rosemary.

Here is a picture from the deep water culture test bed.
The largest leaf on this plant measures 4" wide and 4" long. It has just flowered.  Same type of plant, planted at the same time.  By the way, look in the background of this picture and you can see how much my onions love DWC. If you don't have onions in your DWC get some now!

The flood and drain system is only slightly older than the DWC by about 2 weeks.  Both systems were cycled early last spring so they are approaching their first birthday.  Both have the same number of fish.

So far, it is looking like flood and drain is the way to go for growing eggplant.  Part of making sure your garden can survive is testing things out to see what works best.  Before growing anything on a larger scale, I run a test garden. I am also currently testing peppers in flood and drain versus nutrient film technique (NFT).
Stay tuned for those results.

How do you grow your eggplants?

Monday, September 23, 2013

Don't Overthink or Over Engineer Your Systems

It is so easy to get carried away with the physics involved in building your aquaponic grow systems that the  simple becomes unduly complex.  Complex is not good. Complex is rarely if ever easy to maintain. Try to avoid complex as much as possible.

If you think effort goes into designing a large system, just try to re-design a large system after all components are in place but not functioning as they should.  Implementing the re-design means that you have re-do all the previous hard work.  Not efficient use of time or energy.  If you and your garden want  to survive, you need to use your time and energy as efficiently as possible.

The following is a great case in point of over designing a system.  When the a frames for NFT (nutrient film technique) tubes were first designed and built for the Together We Stand project, the designer was greatly concerned that because the water was going to flow through 4 tubes before draining that all the nutrients would be absorbed by the plants on the top row and the plants in rows 2 through 4 would be nutrient starved.  So a complex manifold system was created and installed to give equal feed of the nutrient rich water into the top of the a-frame.  Truly a beautiful design as you can see from here.
Since each A-Frame has two sides, there was a manifold for each side of the frame.  Of course, this system over engineered a problem that didn't exist.  See, the nutrient levels at the top tube of an A-Frame are not significantly lower than the bottom tubes unless your system is extremely nutrient deficient. So, this overly complex design solved a problem that didn't exist.  However what it did do was utilize flow tubing that was so small you didn't get good water flow and it clogged constantly. In addition, since each tube was fed individually, it drained individually.  If you think that manifold was something, then check out this drain system

Looks like some kind of octopus, right?  In addition, note the use of clear tubing.  Well it was clear at the start I am sure.  But because the clear tubing allows sunlight to penetrate, algae growth was a constant problem and because of the design, 8 drain tubes needed to be cleaned on a regular basis.  All to solve a nutrient feed problem that doesn't exist!

The answer was to re-plumb the A-frame so that water enters in one location on each side of the frame and then feeds and drains each tube in sequence.  

So that anyone working on the system in the future will understand how it operates, each tube was marked at the feed and drain points and also with arrows indicating water flow.
 Note the use of dark tubing for the inlet feed tubing.  For the jumper lines between the tubes, in a stroke of genius my husband realized that garden hose would work perfectly and is certainly less expensive than other hosing. 
Since there is now only 1 drain for each side of the frame, only 2 drains are necessary.  That means we can slay the octopus and the task associated with keeping the lines clean.
It was a bit of a pain, but now these A-Frames will perform their NFT tasks much more effectively and will require much less effort to maintain. 

As a side note, you will notice in some of the photos that the tubes are marked with letters and numbers.  This is something that was implemented back when this shade house was first built.  It was done to help keep crop and maintenance records.  Even if your garden is small, if you have more than one grow bed, NFT tube system or multiple raft beds I highly recommend that you develop some sort of identification system to make your record keeping much easier.

So how did you spend your week-end?


Thursday, September 19, 2013

There Will be Pests

An early morning check of one of my systems really pissed me off.  Oh the fish were doing well, the bed was flooding and draining properly, most plants looked great except.......................the tomato.  Leaves were eaten and it was covered in little flecks of bug poo.

The tomato hornworm had struck overnight (or since my last check yesterday afternoon).  This isn't my picture, but this is what they look like.
This photo is from University of Colorado
I have to show you the picture someone else took because I was so angry I immediately hunted them all down and squished them until they were DEAD.  In a survival garden, it is the gardener that will survive, not the unwanted visitors.  Pests such as the hornworm must die, immediately.  My frenzy did not subside until the last hornworm was nothing but a green mess.

Like all gardens, aquaponics gardens have pests.  Because of the fish component, you cannot just spray poison on your plants.  Even without the presence of fish, I don't like to spray poison because I really don't want to end up eating it.  There are several ways to approach pest control in your aquaponic garden.  The cheapest is the method I employed on the hornworms.  That means searching the plant, pulling the pest off and squishing it or cutting it with shears or any other means of physical demise of the pest.  If your garden is small and your amount of time for pest control large, this is the most common method.

However, if you have a large gardens this might not be practical.  At our Together We Stand gardens, we use the pick and squish method when we have a large number of volunteers and a small number of pests.  This pick and squish method works great for squash bugs as well as those dreaded hornworms.  However, our most common method is the application of a biological pesticide such as Bacillus thuringiensis.  This is a bacteria that naturally occurs in some soils.  This bacteria is highly toxic to many caterpillars and other garden pests, but it is safe for higher life forms (that means you, your fish, your dog, your chickens, your cats, etc).  It can be found most commonly under the name DiPel. This is what we use when the pests outnumber the volunteers.  It is kinda stinky, so you have been warned. If your garden is organic but not aquaponic, you can use DiPel and keep your organic status.  You do have to be careful with the application if your garden has an area for butterfly gardening.  While butterflies are not normally part of a survival garden, their nectar plants are commonly planted in the garden area to attract pollinators. You can bet the drain and flow system that housed those hornworms is getting a dose of DiPel!

You can also use companion plants as pest deterrents.  My father always planted marigolds around his garden.  I hated the smell of the marigolds and he always assured me that most pests agreed with me and would stay out of the garden because they hated marigolds as well.  This year I tested the marigolds I despise so much in the NFT tubes above one of my flood and drain grow beds.  Very little pest problems at all  Marigolds are famous for warding off nematodes (which are not a problem in aquaponic gardens since you are not using soil) but they worked very well for whitefly too! While the plants near the marigolds still attracted a few aphids, it was nothing like the aphids that tried to flock to other areas of the gardens.  So like them or not, marigolds are here to stay in my garden.

Just like any garden, the aquaponic garden must be walked at least once a day during growing season to check for pests and arrange for their demise when found.

Got any ideas on organic pest control?  Share them with me!

Tuesday, September 10, 2013

Following the Laws of Nature

Some of the posts I have read on the aquaponics boards I follow have led me to believe that people think that aquaponics is some sort of plant growing magic.  That if you grow a plant with aquaponics you can somehow ignore all the parameters that nature has placed on a plant. 

It is not true.

If you want to survive, you have to know what will grow successfully when.  If you are in Montana and there is three feet of snow on the ground, you can't grow a tomato with aquaponics unless you control the environment.  The self sustaining nature of aquaponics will not allow that tomato to survive the cold unless you do something to control the temperature.  You need to know the agricultural zone in which you live.  To find your zone number, go to USDA Plant Hardiness Map and enter your ZIP code.  Memorize this number.  When you are researching plants and seeds, the provider will always tell you in what zones the plants will grow.  Staying within your zone will contribute to your success.  Staying within your season is also important. Just like the guys in Montana can't grow tomatoes in winter because of the cold, I can't grow cucurbits (like cucumbers, melons, squash) in summer because the air temperature is just too hot.

That means you need to learn about both growing the fish and growing the plants.  For example, we recently had heavy rains (quite normal for our south Florida summer) and as a result some of my plants (both soil and aquaponic) were infested with powdery mildew.  Just because the plants were in aquaponic systems did not make them immune from the mildew.  In this case, all I did was remove the infected parts (they did NOT go in the compost) and the plants recovered quickly because I acted quickly.  If necessary, I could have sprayed with a solution of baking soda and water (keeping an eye on the pH fo my water).  The point is no matter if the plant is in soil or not, you need to know how to take care of the plants, because if you have a garden you will have pests and diseases.  Your goal is to minimize these while maximizing yield.  That is where aquaponics comes into play. You are going for high yield because you are using your animal protein growing system to provide the food for the plants, thus providing constant nutrition to the plants. 

Another question I read was from someone who wanted to know why the seeds his neighbor have him weren't performing like the neighbor's plants.  Well, if your friends give you the seeds of their hybrid plants, you can't expect them to perform the same.  No matter if the plant is growing in aquaponics or soil, you can't save the seeds of hybrids and expect them to reproduce true.  Always use heirloom or non-hybrid seeds.  Learn to dry and save your own seeds. When someone offers you seed, ask them about their source.

Monday, August 19, 2013

Aquaponics vs Soil - Growing Okra

If you have ever grown okra in soil, you know there is a very small window in which to harvest your okra.  One day's growth can make all the difference between okra that is edible and okra that is so tough and woody you can barely cut it with a knife.

This summer, I have been testing okra in both soil and aquaponics.  I started all tests using Cajun Jewel variety of okra.  This is an heirloom variety and I used organic seed.  I soaked all seeds overnight before planting.  I have to admit, this was great seed from the Southern Exposure Seed Exchange.  The germination rate was almost 100%, with only a couple of seeds not sprouting.

The only fertilizer I used on the soil-based plants was a bit of organic bone meal scratched into the soil as a side dressing two weeks after the plants germinated.  For the aquaponics plants,  I used both flood and drain and deep water raft techniques.  The soil grown plants did begin to produce much faster than the aquaponics plants by almost 10 days. I didn't see much difference in production between the soil plants and the aquaponics plants. All plants produced profusely all summer long.  But I did see one major difference that makes aquaponics the hands down winner.

When grown with aquaponics, the okra was still tender even when it was well over 3 inches long.  The soil based plants produced pods that were quickly tough when they exceeded 1 1/2 inches.  This is important if your schedule doesn't allow you to get out and harvest every single day.  Also, if you are planting for survival, you can't afford to let a single pod go to waste (or the compost). 

As you can see, in this flood and drain set up, the leaves are huge and the pods have been tender, regardless of how large they were allowed to grow. 

Another benefit of the large okra leaves is that they provided shade for my lettuce.  By placing my lettuce in the lower NFT tube, the okra provided needed shade.  I am in South Florida, and our August sun is harsh.  The okra allowed me to continue to grow lettuce with aquaponics when it would not be possible with soil.  This is another survival technique that I recommend.  Layer your garden to take advantage of  what nature provides. It will extend your growing season.

You might notice that I used marigolds on the upper NFT tube as a companion plant.  The only problem I had with pests was a brief encounter with aphids.  I have never been a fan of marigolds, but I am sold on their effectiveness in repelling other pests (especially squash bugs).

So have you tested plants in soil versus aquaponics? I would love to hear your results.

Wednesday, July 17, 2013

Another reason loop siphons beat bell siphons

If you are just getting started with aquaponics, you are probably reading all you can about the miracle of the bell siphon.

Well, they aren't miracles they are physical science in action and while they do fall in the nifty, keen-o, fine-o category we have found several problems with them.

Add one more to that category.........root intrusion from the grow bed!

We recently stepped out of town for a little over two weeks.  We had someone periodically peek in on our systems and feed the fish a few times.  We were shocked when we got the panicked phone call that one of the systems was over-flowing on the grow bed and loosing water in the fish tank.  While we had a good bit of rain in our absence and that might explain an over-all higher water level we do have overflows installed to take care of heavy rain.  Also, rain wouldn't explain why we would loose water from the fish side of the system.  What fun to troubleshoot from 1500 miles away!

Every thing was humming when we left town.  The plants were uber happy and the fish appeared to be happy (hard to tell when they are smiling) so all should have been good. What happened?

Well, the plants were so uber happy that they grew like crazy and even though we had the bell siphon guarded, the roots grew into the siphon itself.  The entire thing was so totally clogged with roots that the siphon could no longer drain.  Now you know it is a serious root blockage if water, one of the most persistent and powerful forces on earth couldn't make it through that root ball!

So, we will develop a new guard to protect the bell siphon from roots.  But, this has only reinforced our decision to stick with loop siphons on all of our other systems.  The design of the loop siphon does not allow for root intrusion and all of the other systems utilizing this design had no problems with roots.

So, bell = bad
Loop = good